Contents
![[-]](/moniwiki/imgs/plugin/arrup.png "[-]")
![[+]](/moniwiki/imgs/plugin/arrdown.png "[+]")
- 1 Row Constructors
- 2 MERGE
- 3 Table Value Parameters
- 4 Grouping Set
- 5 Force Seek
- 6 OPTIMIZE FOR Query Hint Option Include UNKNOWN Variable Value
- 7 INSERT… EXECUTE Statements Can Execute Against Linked Servers
- 8 CONVERT Function
- 9 Lock Escalation Option
- 10 New Data Type ? 날짜관련
- 11 Compound Assignment Operators
- 12 Hierarchyid Data Type
- 13 spatial data types
- 14 참고자료
아..씨발 구찮어..
욕이 저절로 나온다.. ㅡㅡ;;
욕이 저절로 나온다.. ㅡㅡ;;
[edit]
1 Row Constructors #
한 번에 여러 Row를 입력할 수 있다. 직접 예제를 보면 이해가 빠르다.
use tempdb
go

--drop table source_table
create table source_table (
	id varchar(10)
,	pw varchar(10)
);

--drop table target_table
create table target_table (
	id varchar(10)
,	pw varchar(10)
);

--drop table audit
create table audit(
	action varchar(50)
,	insert_id varchar(10)
,	insert_pw varchar(10)
,	delete_id varchar(10)
,	delete_pw varchar(10)
);

insert source_table values
	('dwa', '1234')
,	('yasi', '4567')
,	('lk', 'lk123'); --new syntax, T-SQL Row Constructors
go

/*참고로 이런것도 가능하다.
select *
from (
	values
		('dwa', '1234')
	,	('yasi', '4567')
	,	('lk', 'lk123')
) t(id, passwd)
*/
[edit]
2 MERGE #
'있으면 갱신하고, 없으면 삽입하라'라는 로직에 적합한 구문이다. 즉, 'IF Found THEN UPDATE ELSE INSERT' 이다. 예제는 Row Constructors에서 만든 테이블로 하겠다.
select * from target_table;
/*
id         pw
---------- ----------
dwa        1234
yasi       4567
lk         lk123
*/

--현재 source에는 데이터가 있고, target에는 데이터가 없다.
insert audit(action, insert_id, insert_pw, delete_id, delete_pw)
select action, insert_id, insert_pw, delete_id, delete_pw
from (
	merge --top (100) percent
	target_table a using source_table b
	on a.id = b.id
	when matched then
		update set
			a.id = b.id
		,	a.pw = b.pw
	when not matched by target then
		insert values (id, pw)
	when not matched by source then
		delete
	output $action, inserted.*, deleted.*
) t (action, insert_id, insert_pw, delete_id, delete_pw);

select * from audit;
/*
action                                             insert_id  insert_pw  delete_id  delete_pw
-------------------------------------------------- ---------- ---------- ---------- ----------
INSERT                                             dwa        1234       NULL       NULL
INSERT                                             yasi       4567       NULL       NULL
INSERT                                             lk         lk123      NULL       NULL
*/
매치되지 않는 row를 삽입해 보자.
insert source_table values ('dwa2', '1234');
insert target_table values ('dwa3', '1234');
/*
select * from source_table;
select * from target_table;

id         pw
---------- ----------
dwa        1234
yasi       4567
lk         lk123
dwa2       1234		<--- not matched

id         pw
---------- ----------
dwa        1234
yasi       4567
lk         lk123
dwa3       1234		<--- not matched
*/
not matched 로우들에 대한 처리를 해보자.
insert audit(action, insert_id, insert_pw, delete_id, delete_pw)
select action, insert_id, insert_pw, delete_id, delete_pw
from (
	merge --top (100) percent
	target_table a using source_table b
	on a.id = b.id
	when matched then
		update set
			a.id = b.id
		,	a.pw = b.pw
	when not matched by target then
		insert values (id, pw)
	when not matched by source then
		delete
	output $action, inserted.*, deleted.*
) t (action, insert_id, insert_pw, delete_id, delete_pw);

select * from audit;
/*
action                                             insert_id  insert_pw  delete_id  delete_pw
-------------------------------------------------- ---------- ---------- ---------- ----------
INSERT                                             dwa        1234       NULL       NULL
INSERT                                             yasi       4567       NULL       NULL
INSERT                                             lk         lk123      NULL       NULL
INSERT                                             dwa2       1234       NULL       NULL
UPDATE                                             dwa        1234       dwa        1234
UPDATE                                             yasi       4567       yasi       4567
UPDATE                                             lk         lk123      lk         lk123
DELETE                                             NULL       NULL       dwa3       1234
*/

select * from source_table;
select * from target_table;
/*
id         pw
---------- ----------
dwa        1234
yasi       4567
lk         lk123
dwa2       1234

id         pw
---------- ----------
dwa        1234
yasi       4567
lk         lk123
dwa2       1234

dwa2는 traget_table에 없으므로 insert, dwa3는 source_table not matched이므로 target_table에서 delete
*/
다음과 같이 'AND'로 조건을 추가 할 수도 있다.
insert audit(action, insert_id, insert_pw, delete_id, delete_pw)
select action, insert_id, insert_pw, delete_id, delete_pw
from (
	merge --top (100) percent
	target_table a using source_table b
	on a.id = b.id
	when matched and a.id like 'dw%' then --조건추가 한 것
		update set
			a.id = b.id
		,	a.pw = b.pw
	when not matched by target then
		insert values (id, pw)
	when not matched by source then
		delete
	output $action, inserted.*, deleted.*
) t (action, insert_id, insert_pw, delete_id, delete_pw);

/* 참고..
insert a(id, pw)
select id, pw
from (
	delete from target_table
	output deleted.*
) t
go

--삭제된 것을 조회
create proc usp_teset
as
delete from a
output deleted.*
go
*/
[edit]
3 Table Value Parameters #
일단 테스트를 위한 환경을 만들자. 앞선 내용과 같다.
use tempdb
go

--drop table source_table
create table source_table (
	id varchar(10)
,	pw varchar(10)
);

--drop table target_table
create table target_table (
	id varchar(10)
,	pw varchar(10)
);

insert source_table values
	('dwa', '1234')
,	('yasi', '4567')
,	('lk', 'lk123') --new syntax, T-SQL Row Constructors
go
사용자 정의 타입을 만들고, 저장 프로시저에서 Row Set을 매개변수로 받을 수 있다. 예를 들어 예전에는 입력 매개변수로 '1,2,3,4'와 같은 구분자를 가진 문자열을 파싱하여 테이블 형태로 만들었으나 SQL Server 2008에서는 이 방식을 사용하면 된다.
create type id as table --new syntax, Table Value Type
(
	id varchar(10) null
);
go

create proc table_value_param_test
	@table id readonly
as
begin
	declare @i int = 10; --new syntax
	select * from source_table
	where id in (select id from @table)
end
go

declare @param as id;
insert @param(id) values('dwa'), ('yasi');
exec table_value_param_test @param;
/*
id         pw
---------- ----------
dwa        1234
yasi       4567
*/
[edit]
4 Grouping Set #
ROLLUP과 CUBE를 이용한 쿼리는 다음과 같이 결과를 뿌렸다. 2005 버전 이하에서는 이랬다.
--Grouping Set
use tempdb
go

--drop table grp_set_test
create table grp_set_test(
	group1 int
,	group2 char(1)
,	val int
);

insert grp_set_test values
	(1, 'a', 10)
,	(1, 'a', 20)
,	(1, 'a', 30)
,	(1, 'b', 60)
,	(2, 'a', 70)
,	(2, 'a', 80)
,	(3, 'c', 70)
,	(3, 'c', 90);
go

select
	group1
,	group2
,	SUM(val) as total
from grp_set_test
group by
	group1
,	group2 with rollup;
/*
group1      group2 total
----------- ------ -----------
1           a      60
1           b      60
1           NULL   120
2           a      150
2           NULL   150
3           c      160
3           NULL   160
NULL        NULL   430
*/

select
	group1
,	group2
,	SUM(val) as total
from grp_set_test
group by
	group1
,	group2 with cube;
/*
group1      group2 total
----------- ------ -----------
1           a      60
2           a      150
NULL        a      210
1           b      60
NULL        b      60
3           c      160
NULL        c      160
NULL        NULL   430
1           NULL   120
2           NULL   150
3           NULL   160
*/
2008버전에서는 다음과 같이 할 수 있다. 두 쿼리는 같은 결과를 뿌린다.
--sql server 2008 new syntax
select
	case when grouping(group1) = 1 then 'total' else convert(varchar(5), group1) end group1
,	case when grouping(group2) = 1 then 'total' else group2 end group2
,	grouping_id(group1, group2) grouping_ids --new syntax
,	SUM(val) as total
from grp_set_test
group by
	rollup(group1, group2); --new syntax
/*
group1 group2 grouping_ids total
------ ------ ------------ -----------
1      a      0            60
1      b      0            60
1      total  1            120
2      a      0            150
2      total  1            150
3      c      0            160
3      total  1            160
total  total  3            430
*/

select
	case when grouping(group1) = 1 then 'total' else convert(varchar(5), group1) end group1
,	case when grouping(group2) = 1 then 'total' else group2 end group2
,	grouping_id(group1, group2) grouping_ids --new syntax
,	SUM(val) as total
from grp_set_test
group by
	grouping sets --new syntax
	(
		(group1, group2)
	,	(group1)
	,	()
	);
/*
group1 group2 grouping_ids total
------ ------ ------------ -----------
1      a      0            60
1      b      0            60
1      total  1            120
2      a      0            150
2      total  1            150
3      c      0            160
3      total  1            160
total  total  3            430
*/
위의 결과에서 소계와 총계를 제거해 보자.
--소계 제거
select
	case when grouping(group1) = 1 then 'total' else convert(varchar(5), group1) end group1
,	case when grouping(group2) = 1 then 'total' else group2 end group2
,	grouping_id(group1, group2) grouping_ids --new syntax
,	SUM(val) as total
from grp_set_test
group by
	grouping sets
	(
		(group1, group2)
--	,	(group1)
	,	()
	);
/*
group1 group2 grouping_ids total
------ ------ ------------ -----------
1      a      0            60
1      b      0            60
2      a      0            150
3      c      0            160
total  total  3            430
*/

--총계 제거
select
	case when grouping(group1) = 1 then 'total' else convert(varchar(5), group1) end group1
,	case when grouping(group2) = 1 then 'total' else group2 end group2
,	grouping_id(group1, group2) grouping_ids --new syntax
,	SUM(val) as total
from grp_set_test
group by
	grouping sets
	(
		(group1, group2)
	,	(group1)
--	,	()
	);
/*
group1 group2 grouping_ids total
------ ------ ------------ -----------
1      a      0            60
1      b      0            60
1      total  1            120
2      a      0            150
2      total  1            150
3      c      0            160
3      total  1            160
*/
결과에 대한 제어가 좀 더 쉬워졌다.
참고:
SELECT customer, year, SUM(sales)
FROM T
GROUP BY GROUPING SETS ((customer), (year))

--is the same as
SELECT customer, NULL as year, SUM(sales)
FROM T
GROUP BY customer
UNION ALL
SELECT NULL as customer, year, SUM(sales)
FROM T
GROUP BY year
[edit]
5 Force Seek #
Force Seek는 강제로 인덱스를 태우기(?) 위한 쿼리 힌트다. 예제를 보면 쉽게 알 수 있다. 테스트를 위한 준비를 하자.
use tempdb
go

set nocount on
set statistics io off

--drop table force_seek_table
create table force_seek_table
(
	col1 int identity not null,
	col2 tinyint not null
);
go

begin tran;
declare @i int;
set @i = 1;
while (@i <= 1000000)
begin
	if (@i <=100000)
		insert into force_seek_table (col2) values (10);
	if (@i > 100000 and @i <= 1000000)
		insert into force_seek_table (col2) values (90);
	set @i = @i + 1;
end
commit;
go

create nonclustered index force_seek_table on force_seek_table (col2);
go
다음의 쿼리를 실행해 보자.
select * from force_seek_table
where col2 = 10;
Upload new Attachment "force_seek01.jpg" on the "UploadFile"
SQL Server 옵티마이저는 풀스캔을 선택했다. Force Seek 힌트를 주면 어떻게 될까? 당연히 Index Seek 할테다.
select * from force_seek_table with (forceseek)
where col2 = 10;
Upload new Attachment "force_seek02.jpg" on the "UploadFile"
[edit]
6 OPTIMIZE FOR Query Hint Option Include UNKNOWN Variable Value #
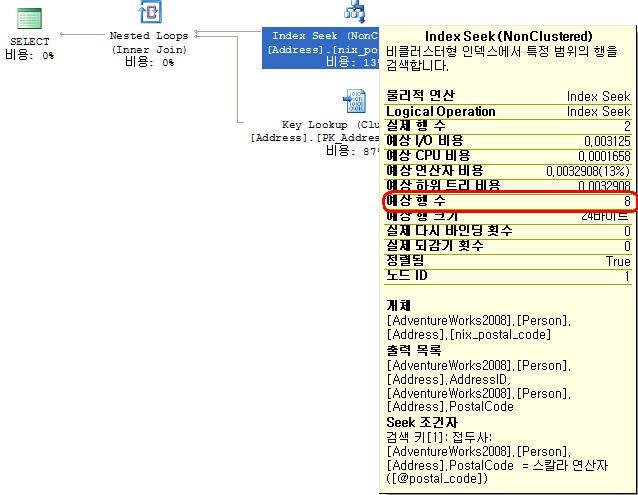
OPTIMIZE FOR 쿼리힌트가 생겼다. (2005 버전 이후) OPTIMIZE FOR는 로컬변수를 사용할 때 옵티마이저가 로컬변수의 불확실성으로 최적화된 쿼리계획을 세우지 못할 경우 옵티마이저에게 통계정보를 잘 이용 할 수 있도록 값을 제공하기 위하여 사용된다. OPTIMIZE FOR에 명시된 값은 쿼리 최적화될 때만 사용되고 실행할 때는 사용되지 않는다. (로컬변수 사용시의 문제점은 Magic Density를 참고하라.)
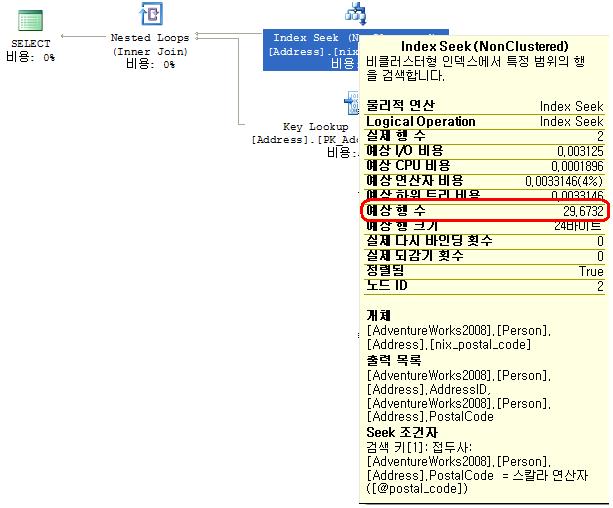
USE AdventureWorks;
GO

EXEC sp_helpindex 'Person.Address';
/*
rowguid
AddressLine1, AddressLine2, City, StateProvinceID, PostalCode
StateProvinceID
AddressID
*/

create index nix_postal_code
on Person.Address(PostalCode);
go

DECLARE @city_name nvarchar(30);
DECLARE @postal_code nvarchar(15);
SET @postal_code = 86171;

--sql1
SELECT * FROM Person.Address
WHERE City = @city_name AND PostalCode = @postal_code
OPTION ( OPTIMIZE FOR (@city_name = 'Seattle', @postal_code UNKNOWN) );
--sql2
SELECT * FROM Person.Address
WHERE City = @city_name AND PostalCode = @postal_code
OPTION ( OPTIMIZE FOR (@city_name = 'Seattle', @postal_code = 98028) );
[edit]
7 INSERT… EXECUTE Statements Can Execute Against Linked Servers #
2005버전에서는 loopback 링크드 서버에 대해서 INSERT... EXECUTE에 대한 지원을 하지 않았다. 하지만 2008버전에는 지원한다. 아래의 예제를 참고하라.
--sql server 2005
create database work;
go

exec sp_addlinkedserver
			@Server='LoopBack'
		,	@SrvProduct='SQLNCLI'
		, 	@Provider=''
		, 	@DataSrc='localhost'
		, 	@Catalog='work';

exec sp_addlinkedsrvlogin 'LoopBack', 'False', 'Sa', 'userid', 'pw';
go

EXEC sp_serveroption 'LoopBack', 'rpc', 'true'
GO

EXEC sp_serveroption 'LoopBack', 'rpc out', 'true'
GO

use work
go
--drop table test
create table test(id int);
insert test values(1);

insert test(id) exec LoopBack.work.dbo.usp_test;
/*
메시지3910, 수준16, 상태2, 줄1
다른세션에서트랜잭션컨텍스트를사용중입니다.

Transaction context in use by another session.
*/

--sql server 2008
create database work;
go

exec sp_addlinkedserver
			@Server='LoopBack'
		,	@SrvProduct=''
		, 	@Provider='SQLNCLI10'
		, 	@DataSrc='localhost\sql2008_ctp6_feb'
		, 	@Catalog='work';

exec sp_addlinkedsrvlogin 'LoopBack', 'False', 'Sa', 'userid', 'pw';
go

EXEC sp_serveroption 'LoopBack', 'rpc', 'true'
GO

EXEC sp_serveroption 'LoopBack', 'rpc out', 'true'
GO

use work
go
--drop table test
create table test(id int);
insert test values(1);
go

create proc usp_test
as
set xact_abort on
select 1
go

insert test(id) exec LoopBack.work.dbo.usp_test;
[edit]
8 CONVERT Function #
declare @chr varchar(4) = 'yasi';
declare @bin varbinary(4) = convert(varbinary(20), @chr);
select
	@bin bin
,	CONVERT(varchar(4), @bin, 0) style0
,	CONVERT(varchar(4), @bin, 1) style1
,	CONVERT(varchar(4), @bin, 2) sytel2
/*
bin        style0 style1 sytel2
---------- ------ ------ ------
0x79617369 yasi   0x79   7961

참고: sys.fn_varbintohexstr
*/
[edit]
9 Lock Escalation Option #
2008버전에서는 락 에스컬레이션을 명시적으로 조정할 수 있는 구문이 생겼다. 직접 테스트 해보자.
--테스트데이터입력
-- SET ( LOCK_ESCALATION = { AUTO | TABLE | DISABLE } )
set nocount on
set statistics io off

--drop table lock_test
create table lock_test
(
	id int primary key
,	name varchar(20)
);
go

begin tran
declare @i int = 1;
while(@i <= 10000)
begin
	insert lock_test
	values(@i, left(convert(varchar(50), newid()), 20));
	set @i = @i + 1;
end
commit;
go

--auto
alter table lock_test
set(lock_escalation = auto);
go
세션1에서 다음을 실행한다.
--session1
begin tran
	update lock_test
	set name = 'update'
	where id between 1 and 6000;
key락인 것을 확인 할 수 있다. 세션1에서 다시 다음을 실행하여 rollback 시킨 후, 다시 7000개의 row를 한 번에 업데이트 시켜보자. 이런 짓을 하는 이유는 락 에스컬레이션이 걸리게 하기 위해서다.
--session1
rollback

--session1
begin tran
	update lock_test
	set name = 'update'
	where id between 1 and 7000;
다시 세션1에서 rollback 시킨 후 테이블의 설정을 다시 바꿔보자. 그리고 다시 트랜잭션을 발생시키자.
--session1
rollback

--table
alter table lock_test
set(lock_escalation = table);
go

--session1
begin tran
	update lock_test
	set name = 'update'
	where id between 1 and 6219;
다시 세션1에서 rollback 후에 더 많은 Row에 락을 걸어보자.
--session1
rollback

--session1
begin tran
	update lock_test
	set name = 'update'
	where id between 1 and 6220;

exec sp_lock
Upload new Attachment "lock04.jpg" on the "UploadFile"
이제 락 에스컬레이션이 발생하지 않도록 테이블의 설정을 바꿔보자.
--session1
rollback

--disable
alter table lock_test
set(lock_escalation = disable);
go

--session1
begin tran
	update lock_test
	set name = 'update'
	where id between 1 and 6220;

--락 에스컬레이션이 일어나지 않음.
Upload new Attachment "lock05.jpg" on the "UploadFile"
[edit]
10 New Data Type ? 날짜관련 #
DECLARE @D0 datetime2(0) = '2008-05-10 06:59:11.1234567';
DECLARE @D1 datetime2(1) = '2008-05-10 06:59:11.1234567';
DECLARE @D2 datetime2(2) = '2008-05-10 06:59:11.1234567';
DECLARE @D3 datetime2(3) = '2008-05-10 06:59:11.1234567';
DECLARE @D4 datetime2(4) = '2008-05-10 06:59:11.1234567';
DECLARE @D5 datetime2(5) = '2008-05-10 06:59:11.1234567';
DECLARE @D6 datetime2(6) = '2008-05-10 06:59:11.1234567';
DECLARE @D7 datetime2(7) = '2008-05-10 06:59:11.1234567';
PRINT @D0;
PRINT @D1;
PRINT @D2;
PRINT @D3;
PRINT @D4;
PRINT @D5;
PRINT @D6;
PRINT @D7;

/*
2008-05-10 06:59:11
2008-05-10 06:59:11.1
2008-05-10 06:59:11.12
2008-05-10 06:59:11.123
2008-05-10 06:59:11.1235
2008-05-10 06:59:11.12346
2008-05-10 06:59:11.123457
2008-05-10 06:59:11.1234567
*/

DECLARE @T0 time(0) = '16:59:11.1234567';
DECLARE @T1 time(1) = '16:59:11.1234567';
DECLARE @T2 time(2) = '16:59:11.1234567';
DECLARE @T3 time(3) = '16:59:11.1234567';
DECLARE @T4 time(4) = '16:59:11.1234567';
DECLARE @T5 time(5) = '16:59:11.1234567';
DECLARE @T6 time(6) = '16:59:11.1234567';
DECLARE @T7 time(7) = '16:59:11.1234567';
PRINT @T0;
PRINT @T1;
PRINT @T2;
PRINT @T3;
PRINT @T4;
PRINT @T5;
PRINT @T6;
PRINT @T7;
/*
16:59:11
16:59:11.1
16:59:11.12
16:59:11.123
16:59:11.1235
16:59:11.12346
16:59:11.123457
16:59:11.1234567
*/

DECLARE @D DATETIMEOFFSET = '2008-05-10 06:59:11.1234567';
DECLARE @D0 DATETIMEOFFSET(0) = '2008-05-10 06:59:11.1234567';
DECLARE @D1 DATETIMEOFFSET(1) = '2008-05-10 06:59:11.1234567';
DECLARE @D2 DATETIMEOFFSET(2) = '2008-05-10 06:59:11.1234567';
DECLARE @D3 DATETIMEOFFSET(3) = '2008-05-10 06:59:11.1234567';
DECLARE @D4 DATETIMEOFFSET(4) = '2008-05-10 06:59:11.1234567';
DECLARE @D5 DATETIMEOFFSET(5) = '2008-05-10 06:59:11.1234567';
DECLARE @D6 DATETIMEOFFSET(6) = '2008-05-10 06:59:11.1234567';
DECLARE @D7 DATETIMEOFFSET(7) = '2008-05-10 06:59:11.1234567';
PRINT @D;
PRINT @D0;
PRINT @D1;
PRINT @D2;
PRINT @D3;
PRINT @D4;
PRINT @D5;
PRINT @D6;
PRINT @D7;
/*
2008-05-10 06:59:11.1234567 +00:00
2008-05-10 06:59:11 +00:00
2008-05-10 06:59:11.1 +00:00
2008-05-10 06:59:11.12 +00:00
2008-05-10 06:59:11.123 +00:00
2008-05-10 06:59:11.1235 +00:00
2008-05-10 06:59:11.12346 +00:00
2008-05-10 06:59:11.123457 +00:00
2008-05-10 06:59:11.1234567 +00:00
*/
[edit]
11 Compound Assignment Operators #
| Compound Assignment Operator | Description |
| += | declare @i int = 10 set @i += 3 print @i --13 |
| -= | declare @i int = 10 set @i -= 3 print @i --7 |
| *= | declare @i int = 10 set @i *= 3 print @i --30 |
| /= | declare @i int = 10 set @i /= 3 print @i --3 |
| %= | declare @i int = 10 set @i %= 3 print @i --1 |
| &= | declare @i int = 10 set @i &= 3 print @i --2 |
| |= | declare @i int = 10 set @i |= 3 print @i --11 |
| ^= | declare @i int = 10 set @i ^= 3 print @i --9 |
[edit]
12 Hierarchyid Data Type #
Hierarchyid는 다음과 같은 특징과 이점을 가진다.
- 계층적 작업을 위한 Data type
- 조직구조
- 파일 시스템
- 프로젝트 태스트 집합
- 언어 용어의 분류
- 웹 페이지 간 링크의 그래프
- 조직구조
- 높은 압축성
USE AdventureWorks
GO

--테이블생성
CREATE TABLE HumanResources.EmployeeOrg
(
   OrgNode hierarchyid PRIMARY KEY CLUSTERED, --여기주목!
   OrgLevel AS OrgNode.GetLevel(), --여기주목!
   EmployeeID int UNIQUE NOT NULL,
   EmpName varchar(20) NOT NULL,
   Title varchar(20) NULL
) ;
GO

--인덱스생성(넓이기반인덱스생성)
CREATE UNIQUE INDEX EmployeeOrgNc1
ON HumanResources.EmployeeOrg(OrgLevel, OrgNode) ;
GO

--루트삽입
INSERT HumanResources.EmployeeOrg (OrgNode, EmployeeID, EmpName, Title)
VALUES (hierarchyid::GetRoot(), 6, 'David', 'Marketing Manager') ;
GO

--검색1

SELECT * FROM HumanResources.EmployeeOrg
Upload new Attachment "hierarchyid01.jpg" on the "UploadFile"
--검색2
SELECT
	OrgNode.ToString() AS Text_OrgNode
,	OrgNode
,	OrgLevel
,	EmployeeID
,	EmpName
,	Title
FROM HumanResources.EmployeeOrg
Upload new Attachment "hierarchyid02.jpg" on the "UploadFile"
DECLARE @Manager hierarchyid
SELECT @Manager = hierarchyid::GetRoot()
FROM HumanResources.EmployeeOrg ;

INSERT HumanResources.EmployeeOrg (OrgNode, EmployeeID, EmpName, Title)
VALUES
(@Manager.GetDescendant(NULL, NULL), 46, 'Sariya', 'Marketing Specialist') ;

--검색
SELECT
	OrgNode.ToString() AS Text_OrgNode
,	OrgNode
,	OrgLevel
,	EmployeeID
,	EmpName
,	Title
FROM HumanResources.EmployeeOrg
Upload new Attachment "hierarchyid04.jpg" on the "UploadFile"
--귀찮으니프로시저생성후삽입
CREATE PROC AddEmp(@mgrid int, @empid int, @e_name varchar(20), @title varchar(20))
AS
BEGIN
   DECLARE @mOrgNode hierarchyid, @lc hierarchyid
   SELECT @mOrgNode = OrgNode
   FROM HumanResources.EmployeeOrg
   WHERE EmployeeID = @mgrid
   SET TRANSACTION ISOLATION LEVEL SERIALIZABLE
   BEGIN TRANSACTION
      SELECT @lc = max(OrgNode)
      FROM HumanResources.EmployeeOrg
      WHERE OrgNode.GetAncestor(1) =@mOrgNode ;

      INSERT HumanResources.EmployeeOrg (OrgNode, EmployeeID, EmpName, Title)
      VALUES(@mOrgNode.GetDescendant(@lc, NULL), @empid, @e_name, @title)
   COMMIT
END ;
GO

EXEC AddEmp 6, 271, 'John', 'Marketing Specialist' ;
EXEC AddEmp 6, 119, 'Jill', 'Marketing Specialist' ;
EXEC AddEmp 46, 269, 'Wanida', 'Marketing Assistant' ;
EXEC AddEmp 271, 272, 'Mary', 'Marketing Assistant' ;
EXEC AddEmp 6, 120, 'yasi', 'Marketing Specialist' ;

--검색
SELECT
	OrgNode.ToString() AS Text_OrgNode
,	OrgNode
,	OrgLevel
,	EmployeeID
,	EmpName
,	Title
FROM HumanResources.EmployeeOrg
Upload new Attachment "hierarchyid05.jpg" on the "UploadFile"
SELECT
	OrgNode.ToString() AS Text_OrgNode
,	hierarchyid::GetRoot() AS Text_Root
,	OrgNode.GetAncestor(1) AS Text_Ancestor
,	(SELECT EmpName FROM HumanResources.EmployeeOrg B
	WHERE B.OrgNode = A.OrgNode.GetDescendant(0x78, NULL)) 자식
FROM HumanResources.EmployeeOrg A
WHERE EmpName = 'David'
Upload new Attachment "hierarchyid06.jpg" on the "UploadFile"
[edit]
14 참고자료 #
![[http]](/moniwiki/imgs/http.png) SQL Server 2008 T-SQL Enhancements Part - I (Intellisense)
SQL Server 2008 T-SQL Enhancements Part - I (Intellisense)
- SQL Server 2008 T-SQL Enhancements Part - II (UDTs and TVPs)
- SQL Server 2008 T-SQL Enhancements Part - III (HierarchyID and Large UDTs)
- SQL Server 2008 T-SQL Enhancements Part - IV (Filestream)
- SQL Server 2008 T-SQL Enhancements Part - V (Spatial)